Spring Cleaning … for your Inbox? 5 Tips for Clearing the Clutter in Outlook
So here we are. It’s springtime and you know what that means. Spring cleaning! We often clean and reorganize our whole house and maybe our office at this time of year. It can make us feel renewed and energized. But just how many of us think about spring cleaning our inbox?
Most people don’t give it a second thought. If you’re like me, you probably have a bunch of emails sitting in your inbox just taking up space. Like that box of old clothes taking up space in your trunk, a full and cluttered inbox can lead to productivity problems. Now is a great time to take action to clean it up.
So where do you start? Taming the cluttered inbox may seem like a daunting task but there are a few simple and easy steps that you can take to get started. Here we will look at five basic features in Outlook that might help.
1. Remove Redundant Messages
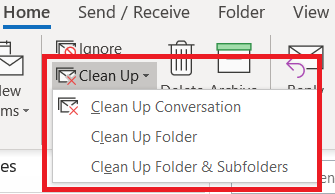
First, you can use the Clean Up Conversation button to reduce the number of messages in a conversation. Look for it in the Home tab in the Delete group. A conversation is just another way to say email thread. When you have an email with multiple replies or addressed to multiple people with multiple replies, you end up with the same message over and over in your inbox. Outlook will analyze the selected conversation, keep the last email in the thread that contains a copy of all the replies, and automatically move redundant messages to the delete folder. The Clean Up Button has two other options, “Clean Up Folder” and “Clean Up Folders and Subfolders,” these options clean the conversations in the selected folder or the selected folder and any subfolder it contains, respectively.
2. Archive Messages
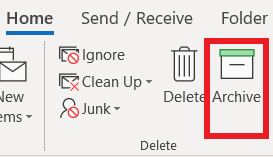
An inbox full of emails that you have already read can be stressful. Next on the list, is to archive old mail. An inbox full of emails that you have already read can be stressful. If you Archive emails, you will still have access to them, but it will not linger in your inbox. The Archive button, on the Home tab in the Delete group, will move the selected email to an Archive Folder.
You can also perform the Archive process on more than one email at a time. Simply, go to File > Info > Tools > Clean Up Old Items. Additionally, there are two other options on that menu that can help you clear that clutter. Mailbox Cleanup will give you more options, such as finding emails older than 90 days. Empty Deleted Items Folder will permanently delete items in the Delete Items Folder.

3. Create Folders
There’s a hot debate out there right now about whether or not to use folders to store emails. Some say that it is old school and not very efficient. This may be true, but I still use them. I use folders in conjunction with Categories and Rules to add efficiency. More on Categories and Rules coming up next.
To create a new folder, simply right click in the left pane where you want the folder to live and select New Folder. Then, type the name of the new folder in the Name box and hit enter. You can also create subfolders in the same way. Once you have created the folders, you can drag emails to the folder where you want to keep it.

4. Create and Assign Categories
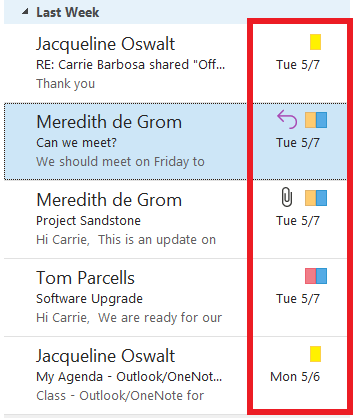
Categories can help you easily group and identify emails at a glance. You can assign on or more color values to each email.
To assign a color value, click on Categorize in the Tags group on the Home tab.
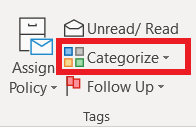
You can assign a category by selecting it from the list. If you have never used categories, then you will see the default list of categories named by color on the drop down menu. The categories here have been customized.
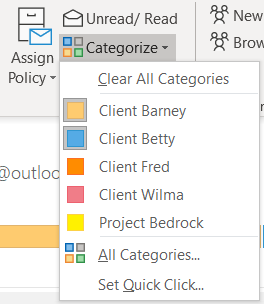
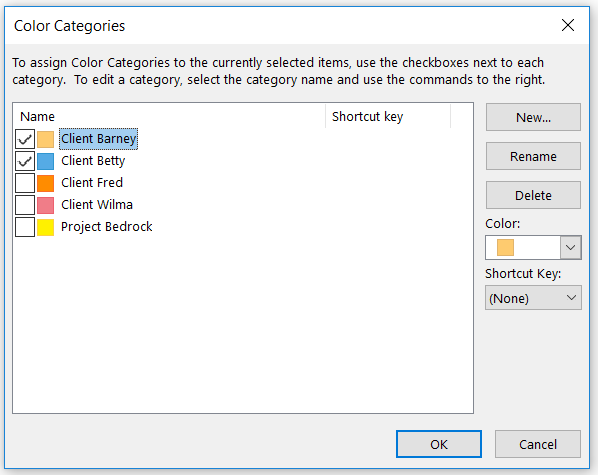
To customize the Categories to suit your needs, click on All Categories.

Then, use the options on the right side of the dialog box to add a new categories, rename categories, delete, categories, change colors, and even add a keyboard shortcut. You can also apply more than one category by using the check boxes to the left of the category. Click Ok when you are finished.
5. Set Up Rules
Until now, this post discussed items that you must apply manually. Not only can that be time consuming, but it can also be tedious. Applying Rules can help you save time by automating your email. There are many ways to implement rules to make your email work for you. For example, rules can automatically send an email from specified sender to a particular folder or display an alert when an email certain words in the subject line is received. These are just some very basic choices to get you started with using rules. We will cover Advanced Options in our Webinar on Thursday.

Learn More
If you are interested in learning more, join Knack Training for a free webinar on Thursday, May 16, 2019 at 2 pm EST. Registration is required. We will cover these topics and more to give you some to ideas to help you to clear the clutter and tame your inbox.
Related everyday office posts
Save a Click: Create a Quick Step to Help you Keep Your Inbox Clean
Think about all the clicks you have to make while checking your email. Every click adds to the amount of...


Use a Macro to Respond with an Email Template
Here are the two versions of this macro – one for new emails, and one for responding to emails: Sub...